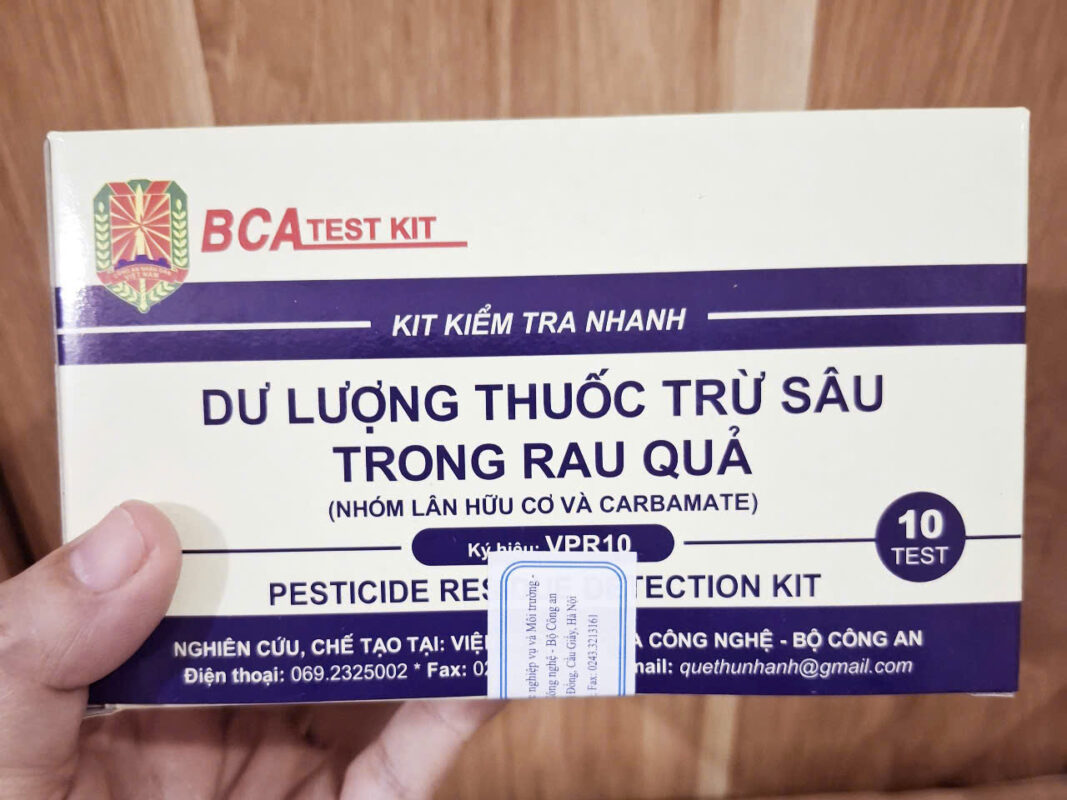
Product Description
The rapid pesticide residue detection kit (VPR10) is designed to quickly detect pesticide residues belonging to organophosphate and carbamate groups in vegetables and fruits, with a detection limit of 0.5 ppm. The kit is sufficient for 10 tests.
It is simple and easy to use, making it suitable for rapid on-site screening of pesticide residues in fresh produce at supermarkets, restaurants, industrial kitchens, hospital canteens, schools, and companies involved in fruit and vegetable distribution.
Advantages
-
Detects two common pesticide groups: Organophosphates (OPs) and Carbamates
-
Very fast analysis time
-
Easy to store and use
-
Does not require advanced technical knowledge
-
No need for laboratory or complex instruments
-
A safe, cost-effective solution for on-site quality control
Applicable Samples
-
Leafy vegetables: Cabbage, lettuce, romaine, etc.
-
Root vegetables: Tomatoes, carrots, etc.
-
Fruits: Apples, pears, grapes, strawberries, etc.
Note:
- Lime: The acidity and essential oils may interfere with test accuracy.
- Malabar spinach: High viscosity can hinder sample extraction, leading to less accurate results.
Instructions for Using the VPR10 Kit
Sample preparation:
-
For leafy vegetables: Cut both leaves and stems into corn kernel-sized pieces and mix well.
-
For fruits: Peel off about 5 mm of the skin, then cut into small pieces like vegetables
Procedure:
Step 1:
Place about 10 g of the chopped sample into the extraction bag (should fill ~1/3 of the bag).
Step 2:
Pour 10 ml of clean water into the plastic cup. Use the clamp to break both ends of the activating reagent ampoule and pour its entire contents into the cup. Swirl gently, then pour the solution into the extraction bag and mix for about 3 minutes.
Step 3:
Take a solvent ampoule, hold it upright, break the top using the clamp, and pour all of its contents into the extraction bag. Seal the bag and gently shake for about 2 minutes.
Step 4:
Tilt the bag to gather the mixture at one corner. Cut the opposite corner to create a small hole. Open the separation tube (with the colored plug at the bottom), and pour the extract into the tube. Gently press the bag to collect as much solvent as possible. Tighten the cap and let it stand vertically until the solution separates into two layers.
Step 5:
Position the lower end of the tube over a glass petri dish, and cut off the bottom of the plug to release the lower solvent layer into the dish.
Important: Only collect the lower layer. Once most of it has drained, tighten the cap again to control the final drops.
Let the solvent evaporate naturally in a well-ventilated area until it dries completely (about 15–20 minutes).
Step 6:
Open the reagent pack and take out the CV1, CV2 tubes, and the test paper.
Step 7:
Once the dish is dry, place a piece of cotton inside. Use a syringe with a cone tip to draw 0.2 ml of buffer solution, then apply it to the cotton. Use tweezers to rub the cotton across the dish to absorb any remaining extract.
Step 8:
Insert the cone tip into the cotton and gently pull the plunger to collect the absorbed liquid. If liquid remains in the dish, reuse the same cotton to absorb it. Transfer all collected liquid into the CV1 tube, cap, and shake vertically. Let the reaction occur for 30 minutes.
Step 9:
Use the second cone tip to add 0.1 mL of Reagent S into the CV2 tube. Shake to dissolve the contents, then transfer the solution into CV1, shake well, and wait 5 minutes.
Step 10:
Open the test paper pouch, use tweezers to place the green test strip into CV1.
Observe the result after 5 minutes.
Interpreting Results:

Precautions:
- Only read the result within 5 minutes; readings taken outside this window may be inaccurate.
- Avoid contact between reagents and skin. In case of contact, rinse thoroughly with water.